Offloading GTM with partytown, nextjs and app router
Increase your lighthouse score with partytown by offloading your third party libraries on a worker thread!
INTRODUCTION
Have you ever found yourself frustrated by the notorious lighthouse performance drops caused by third-party scripts such as Google Tag Manager, Google Analytics, and similar libraries?
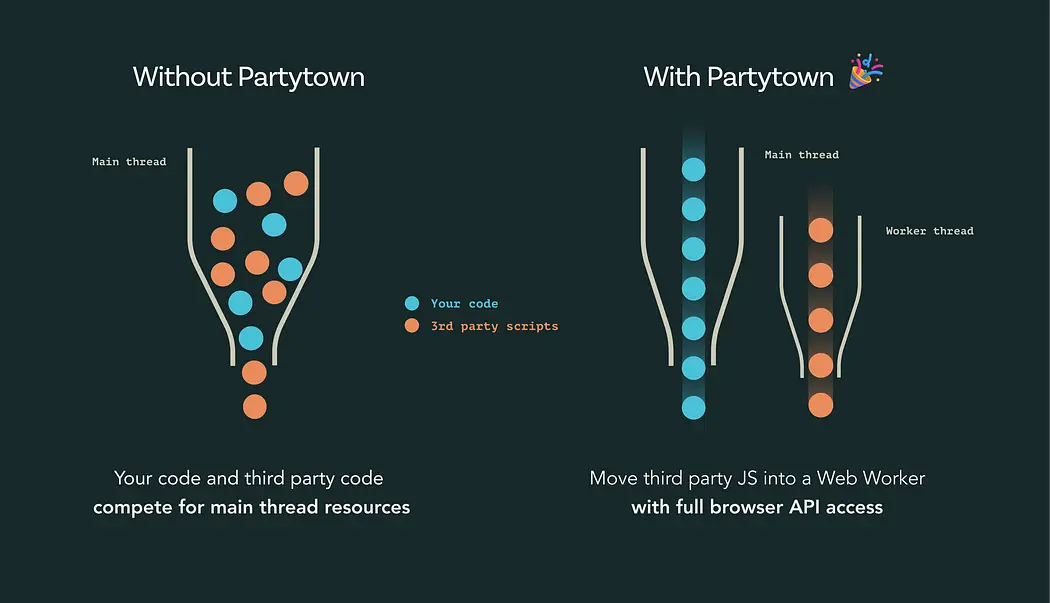
Well, here's some good news: You can now improve your lighthouse scores with Partytown! This nifty tool helps you load third-party scripts off of your main thread and instead loads them via a worker thread. This means your main thread is freed up to handle other essential tasks like loading your Largest Contentful Paint (LCP) content, critical CSS, and other network requests.
If you're using Next.js page router, implementing this solution is a breeze. Simply utilize the worker strategy in your Next.js <script> tags, as outlined here: [link to Next.js documentation]. However, it's worth noting that the worker strategy isn't currently supported by Next.js' app router. But fear not, because that's exactly what we'll be tackling in this blog post!
Keep in mind that the worker strategy in Next.js also leverages Partytown behind the scenes, making it a powerful solution for optimizing your web performance. Stay tuned for our upcoming blog post where we'll dive deeper into how to implement this strategy and supercharge your Next.js app's performance!
PARTYTOWN
To kickstart the optimization process in your Next.js project, the first step is to install Partytown. Simply run the following command in your terminal:
1yarn add @builder.io/partytownNow that Partytown is installed in your project, let's configure it to optimize your performance further. To do this, we'll add two new scripts in your package.json file, which will generate the Partytown scripts in your public directory.
Open your package.json file and add the following scripts:
1"scripts": {
2  "build": "npm run partytown && next build",
3  "partytown": "partytown copylib public/~partytown"
4}
Once you've added these scripts, you can generate the Partytown scripts in your public directory by running:
1yarn build-partytownThis will ensure that Partytown is configured and ready to enhance the performance of your Next.js project.
To simplify things, let's focus on offloading Google Tag Manager in this blog post. However, keep in mind that you can apply the same principles to offload any other third-party script you desire.
To offload Google Tag Manager, we'll start by importing Partytown in our root layout and rendering it inside the head section. I've prepared a component for Partytown with the Google Tag Manager configuration so that we can easily load this component directly into our layout file. Here's the Partytown component:
1// partytown.tsx
8 <>
9 <Partytown
10 debug={false}
11 loadScriptsOnMainThread={[
12 'https://googleads.g.doubleclick.net',
13 'https://www.googletagmanager.com',
15 forward={[
16 ['dataLayer.push', { preserveBehavior: true }],
17 ['gtag', { preserveBehavior: true }],
18 ['gtm.push', { preserveBehavior: true }],
20 />
22 <script
23 id='ga'
24 type='text/partytown'
25 dangerouslySetInnerHTML={{
26 __html: `
27 (function(w,d,s,l,i){
28 w[l]=w[l]||[];
29 w[l].push({'gtm.start': new Date().getTime(),event:'gtm.js'});
30 var f=d.getElementsByTagName(s)[0], j=d.createElement(s),dl=l!='dataLayer'?'&l='+l:'';
31 j.async=true;j.src= 'https://www.googletagmanager.com/gtm.js?id='+i+dl;
32 f.parentNode.insertBefore(j,f);
33 })(window,document,'script','dataLayer','GTM-XXXXXX');
35 }}
36 />37It's important to note the significance of specifying the type as 'text/partytown' on line 24 of the Partytown component. This declaration informs Partytown that this particular script should be loaded via Partytown in a web worker rather than on the main thread. This level of control is one of the key advantages of Partytown, allowing us to finely tune which scripts are offloaded for optimized performance.
For a deeper understanding of how the type parameter functions, I highly recommend referring to Partytown's official documentation: Partytown Documentation.
With our Partytown component configured, all that's left to do is import this component within the head tag of our root layout file.
Lastly, don't forget to include the following script within the body tag of your layout file:
1{/* <!-- Google Tag Manager (noscript) --> */}
2<noscript>
3    <iframe
4        src="https://www.googletagmanager.com/ns.html?id=GTM-XXXXXXXX"
5        height='0'
6        width='0'
7        style={{ display: 'none', visibility: 'hidden' }}
8    />
9</noscript>
10{/* <!-- End Google Tag Manager (noscript) --> */}
Before wrapping up, it's crucial to emphasize the importance of replacing the placeholder GTM ID in the Partytown component with your own Google Tag Manager ID. This ensures that your Google Tag Manager configuration is properly linked to your website.
Now that all the pieces are in place, there's one final step remaining: firing the gtm.start event from the useEffect hook in your root component. Interestingly, Partytown doesn't automatically send this event, which can lead to Google Tag Manager Assistant failing to detect a proper configuration.
Here's how you can implement this step:
1const hasLoaded = useRef<number>(0);
2
3useEffect(() => {
4        if (hasLoaded.current === 1) return;
5        hasLoaded.current = 1;
6        setTimeout(() => {
7            // @ts-ignore
8            window.dataLayer = window.dataLayer || [];
9            // @ts-ignore
10            window.dataLayer.push({
11                event: 'gtm.js',
12                'gtm.start': new Date().getTime()
13            });
14        }, 2500);
15}, []);
Great news! With the provided code, you're all set to test your Google Tag Manager configuration using the Google Tag Manager Assistant tool. Additionally, by inspecting your network logs, you'll notice that all your GTM events are being sent via the Partytown web worker scripts.
This setup not only optimizes the performance of your Next.js application but also ensures that your Google Tag Manager setup is functioning smoothly. Happy testing, and enjoy the improved performance and analytics integration!
Thanks for reading!